Category: tucking in

  • Strip this Pan, Part Three

    Time being limited and linear, it’s taken me over a month to get around to tackling the twenty-inch reversible grill reseasoning project.

    For reference, check out parts one and two wherein I presented my options to deal with the pitting that was destroying the five-year-old seasoned surface of my Saturday morning pancake flattop and tried the least aggressive way I had read about, soaking in vinegar, to strip the seasoning. Spoiler alert, vinegar didn’t work.

    A couple days ago I went to the store and picked up a can of oven cleaner, a pack of abrasive dish cleaning pads, a roll of industrial strength paper towel, and a pack of steel brush wheels for my power drill.

    What I’ve read online (since I’ve never stripped a pan this way before) was that spray on oven cleaner is an agressive chemical approach to degrading the seasoning of the pan enough that you can pretty much just wipe it off.

    It wasn’t quite that simple, of course.

    The instructions I had read told me to coat the surface in oven cleaner, wrap in a plastic bag, and wait twenty-four hours.

    Tick. Tick. Tick.

    Furstratingly, a day later, I had a pan with some very clean, but still very firmly attached, seasoning.

    Back to the drawing board.

    Yesterday afternoon I rinsed off the pan, and switched over to the drill and wire brush method. Forty-five minutes of shoulder aching, noisy, smelly, whirring away on the pan, I had stipped about half of the top surface down to bare iron.

    To be honest, I’ve not been too worried about the edges or the reverse side. The bottom of this pan is a ridged grill pan that I think we’ve used less than five times since we bought this piece. It’s not that it isn’t useful, it’s just that this grill is pretty much my dedicated pancake pan and the smooth side gets used weekly and so consequently the smooth side is the side that I care about.

    But even given that I only cared about the top half of the pan, a day plus forty five minutes of neighbourly-annoying outdoor cast iron maintenance had only got me part way to what I’d accomplished pretty much passively when I reseasoned this years ago by the self-cleaning oven method. That method, of course, has it’s risks not the least of which is the risk of the pan cracking in extreme heat, but with a crick in my back and a small bit of flaking seasoning embedded under my bleeding thumbnail (did I mention that part?) I was starting to reconsider the risk versus reward calculation.

    Then I had a bit of an idea … mostly because I was tired and it was starting to get dark out

    I lightly burred down the rest of the still-seasoned parts of the cooking surface with the steel wire brush, then resprayed with oven cleaner before stuffing it back in the bag and stowing it once again for an overnight.

    This morning the results of the combined method had seemed to have paid off respectably well.

    Over the pan where I had scuffed the surface of the seasoning, the chemical oven cleaner had been able to get under and into the old seasoning. It was able to do the job I had expected a day earlier. The bulk of the old seasoning flaked off and easily washed away with a little bit of light scouring from a dish pad.

    I was able to grind the remaining stubborn specks off with the drill setup, wash it down really well, dry it up, and …

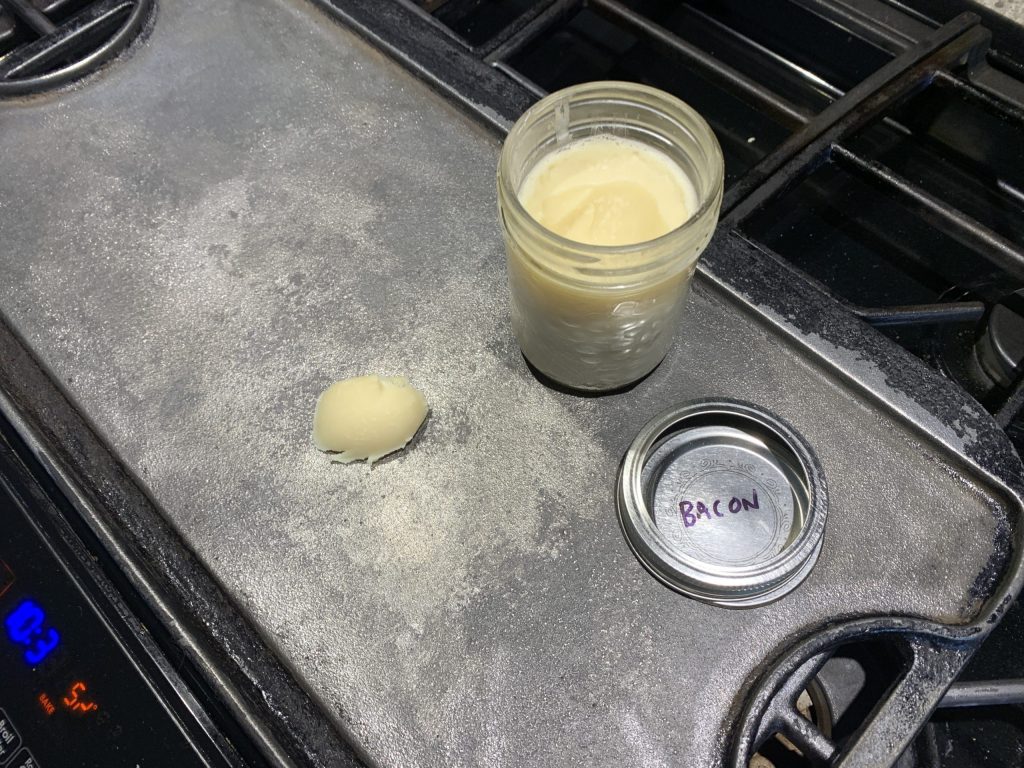
    … as I write this post the pan is in the oven baking on a first coat of bacon grease seasoning.

    I’ll spend the day doing multiple coats of a new seasoning layer, getting it back up to a surface that I can attempt some pancakes on in the coming week, and of course, report back with how it all turned out!

    And hopefully part four is the part where I tell you how great it all turned out … and not me resorting to the self-cleaning oven again.

  • Friday Frights: Cast Iron Versus Magic

    There are countless great arguments to switch to cooking with cast iron, but a socio-political one was outlined recently by the HBO Comedy show, Last Week Tonight, as they profiled a report on the effects to both our health and the environment from the types of chemicals used to make other non-stick frying pans.

    You can watch the twenty-minute clip embedded below … which if you are unfamiliar with the show is a late-night, no-holds-barred news-comedy program. (And a language/political-bend warning for those with sensitive minds.)

    To sum up ( if the clip doesn’t play in your part of the world) a group of chemicals called PFAs have been used to make all sorts of modern products since the 1950s. While there have been countless conveniences from these products, there have also been many environmental and human health problems that have been identified from the manufacture or disposal of things containing those chemicals.

    One of the big, well known products is Teflon™ which could be considered the non-stick alternative to a well-seasoned cast iron pan.

    But where cast iron becomes non-stick through seasoning, a process that can be done at home and involves the polymerization of food-safe oils into a thin, slick surface on top of the raw iron, chemical non-stick coatings are factory applied and involve typical sorts of industrial side effects.

    Of course, manufacturing cast iron cookware is undeniably a resource intensive effort, too. Mining, refining, extreme heat, and casting, not to mention the costs of shipping heavy pieces of cookware around the world.

    Neither of these are perfect.

    But as the scales weigh out the pros and cons, cast iron versus coated non-stick pans, factoring in things like longevity of the cookware itself, sustainability of the manufacturing process, impacts to our well-being and our world, and the accumulation of chemical debt that is incurred by the mass production and disposal rates of both these options, I more and more feel like those scales are tilting out towards cast iron.

  • Recipe: Classy Cordon Bleu

    The recipe has a different name in our collection, but as the kid pointed out half way through her portion last night “this is basically just fancy cordon bleu, right?”

    She pronounced it with an impeccable French tongue, too. I guess ten years of French Immersion school has finally paid off.

    But she’s not wrong.

    Or, at least, not too far from correct.

    Anyone familiar with the already-kinda-fancy dish cordon bleu knows that a bit of chicken breast is rolled or stuffed with some ham and swiss cheese, spiced, breaded and baked. It’s a tasty bit of chicken dish with a surprise, creamy filling.

    This slightly upscale alternative (which we poached from some long forgotten YouTube cooking channels) is a bit of chicken rolled or stuffed with some fancy ham (prosciutto) and some fancy cheese (we used some boursin herb and garlic), spiced, skipped the breading, and baked.

    Our classy version hits the same notes as the original: savoury chicken, a warm creamy inside, but adds some unique notes that bring it up to an elevated, but still cook-at-home, quality.

    Plus I get to use my big Staub braiser.

    the recipe

    4 slices butterflied chicken breast
    1 teaspoon salt
    1 teaspoon black pepper
    1 teaspoon paprika
    4 tablespoons soft herb cheese
    8 slices prosciutto
    4 tablespoons sun dried tomatoes
    8 pieces fresh basil
    2 tablespoons olive oil

    1/4 cup lemon juice
    1/2 cup chicken broth

    After combining the salt, pepper and paprika into a rub for the chicken breasts, coat with the seasoning and lay out on a surface. The chicken is “stuffed” with a layer of each of the soft cheese, prosciutto, sun dried tomatoes and fresh basil, rolling it into a tight coil and holding together with a skewer or toothpick.

    In a large cast iron braiser (or using a frying pan and a baking dish) fry the rolls about a minute per side in a bit of oil, then pour the mixture of the lemon juice and chicken broth into the braiser (or baking dish with the chicken) and bake for about 15 minutes at 425F, turning once.

  • Sourdough Science Saturday

    My starter is a little over two and a half years old and as I alluded to in my previous post I’ve baked about two hundred and fifty-ish loaves of bread with it, pre- and during pandemic.

    You would almost think I would understand it better.

    About an hour ago I pulled my Thanksgiving loaf from the oven and it turned out great.

    All around, I followed my basic twenty-four hour prep-and-proof plan, the process I’ve been fine tuning for years even before this starter, and which works for me fairly consistently.

    Only it sometimes doesn’t.

    Like this summer.

    This summer we had a heat wave for a solid month where the temperatures outside rarely dropped below twenty-five degrees at night and routinely stuck in the mid-to-high thirties during the day. Also, it rarely dropped below twenty-five degrees in our house (including the kitchen) which was a nightmare, the waking kind, because I could hardly sleep in those conditions.

    All the bread I baked during this month flopped.

    Poor rise. Dense crumb. Edible … but not enjoyable.

    And at the time I got it into my head that the heat was putting my yeast into some runaway proof and I was missing the window to bake it and get a good loaf.

    However.

    I’ve had a few months to think about this, and my nineteen degree kitchen (where I proofed today’s loaf to within one standard deviation of perfection) only added another layer of evidence to my theory.

    “You’d think the yeast would have liked the heat.” Went the conversation with my wife. “But I think my yeast aren’t loving it.”

    Not all yeast are created equally, after all. In fact, there are fifteen hundred known varieties of yeast, and the yeast that come in the little envelope from the grocery store may have very little lineage in common with the yeast I caught in my kitchen two and a half years ago.

    The yeast from the store are bred to grow consistently, quickly and thrive at warm temperatures.

    I’d be willing to bet that whatever yeast I found thriving in my kitchen air and trapped in my starter probably prefer, say, a dry central Canadian climate and do quite well in my nineteen degree kitchen. Wouldn’t it make sense, after all, that the most common yeast floating around my house were probably plentiful enough to be caught because they actually favoured … preferred … had maybe even adapted to … the conditions of my house?

    So, back in June when my house was eight or nine degrees warmer than normal, those nineteen-degree-loving yeast … well, they made some garbage bread.

    And today, when my thermostat is regulating the house to optimal conditions for both me and my yeast … well logically they made a loaf of awesome bread.

  • Short: Long Weekend & Floury Friday

    In Canada, we celebrate our Thanksgiving in October.

    The right way.

    And as we prepare a large meal for Sunday evening, my wife is out shopping for a fresh turkey and I’ve spent Friday evening getting my sourdough started.

    While making sourdough has become fairly routine around our house, I find myself usually making sandwich loaves. In fact, over the duration of the pandemic I’ve baked about two hundred and twenty sandwich loaves … but only four classic dome loaves.

    So, Thanksgiving is a lot of things, but it’s a thankful opportunity to bake up a beautiful classic loaf of sourdough to enjoy with our Sunday dinner. I settled on a basic white flour loaf with about twenty percent organic spelt mixed in. Nothing beats sopping up some turkey gravy than a thick slice of buttered sourdough, after all.

    And of course, the work starts on Friday.